Thursday, May 31, 2012

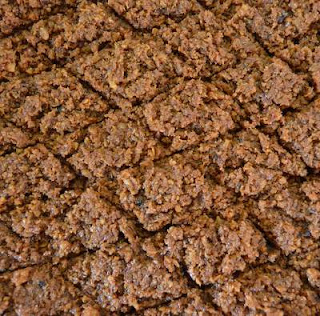
Coconut burfi with jaggery

My husbands grandparents (86 and 92 years young) visit us once a year. It is during these visits that I sit with them and speak to them about their childhood and life. During one such visit, I casually asked Ajja (grandfather) what was one sweet/dessert that Ajji (grandmother) made the best. 'Kobri mittai!'(coconut burfi) came the reply, eyes glittering with memories of the past . That was when I decided to become Ajji's apprentice in the kitchen for the day.When I mentioned to Ajji that we would be making a jaggery version of kobri mittai along with the sugar version of the same, she thought for a while and said, 'though I have never made it with jaggery, no harm in trying'. So here I share with you the recipe passed down from Ajji to me with a few modifications. 


You will need

3 cups of grated coconut( 1 large coconut)
1.5 cup jaggery (powdered)
1  cup milk (optional)
¼ pod vanilla powdered (or the ''caviar'' of one full vanilla)
1 pod cardamom (powdered) or saffron
 oil/ghee to grease the tray.


Method

In a heavy bottomed pan mix all the ingredients.


Cook in low flame with constant stirring. Take care to see that the mixture doesn't stick to the bottom of the pan.


Burfi is done when the mixture forms a single mass and no longer sticks to the bottom.
.


Pour into a greased tray and cut when warm.


Note: Ajji lets all the ingredients to soak in the pan for at least 5 hours before heating.
Those who want a 'richer' version may include about 2 tablespoons of  unsweetened Kova (condensed  milk)
For those who are curious, Ajji loved 'jaggery kobri mittai' and Ajja later gave me a list of delicacies to be learnt from Ajji!

Vegetable Kurma


This recipe is an all time favourite in the family. Though the recipe uses a blend of spices it is not pungent.


You will need,

1 cup fresh peas
1 cup minced carrot
1 cup chopped beans
1 large potato cut into cubes
Salt and jaggary to taste


For the masala

One half of a coconut,  grated or made to pieces.
3 cardamom
4 clove buds
A piece of black stone flower( pather ke phool/ kallu hoovu)
One arm of star anise (seed removed)
1’’x1/4’’ piece of cinnamon
2 Marathi moggu
Pepper corns about 10
½ tsp  Shah jeera or jeera( cumin)
3-4 Almonds/5-6 cashew
1-2 tablespoon Hurigadale/Putani/ roasted split (black)garbanzo.


Seasoning

Unrefined oil 1tsp
½ tsp jeera or cumin seeds
¼ tsp turmeric powder
1-2 large finely chopped/minced onion
1 red capsicum finely chopped/minced
½ finely chopped/minced green capsicum
Small bunch of finely chopped/minced cilantro


Method

Cook the vegetables with a little water (about ½ a cup) in a cooker (3 whistles) or cook the vegetables in an open pan with water.
Blend together all items of masala with salt, jaggery and a little water till a fine paste and keep aside.


Heat a pan, add 1tsp oil, cumin seeds.

When cumin splutters, add turmeric, mix well and add the minced vegetables for seasoning.
Saute till all water has evaporated.


Add the steamed/boiled vegetables, the masala paste, more water if needed and boil till thick.


Tasty Vegetable Kurma is ready to be eaten with chapati, bread, flat bread or rice.


Note: You may use any combination of vegetables.

Wednesday, May 30, 2012

Capsicum rice


One busy afternoon we were greeted by unexpected guests. I had to quickly make something tasty and that is how this recipe was born.
Though this recipe is simple and easy, it is extremely tasty.

You will need

1 red capsicum
1 green capsicum
1 yellow capsicum
1 tsp cumin seeds
2 teaspoon or less unrefined oil or butter or ghee.
2  cups cooked integral/unpolished rice  ( if possible,add salt when cooking )
Salt to taste.
Juice of half a lemon (optional)

Method

Clean and finely chop/mince capsicum.
Heat a skillet and add oil/ghee/butter.
Add cumin seeds and let it splutter.
Now add capsicum sauté till cooked. Add salt, mix well, add cooked rice, mix.
Turn off heat.
Now add lemon juice if needed. 
Mix and serve hot.
You could use a single coloured capsicum too.


Healthy Bhel puri- Tomato free, Chilli free


Last week my sister, her kids (aged 8 and 5), sister-in-law were all visiting us. In the evening I made this modified version of Bombay bhel. Though it didn't contain green/red chilly, tomato, deep fried sev, everyone thoroughly enjoyed it. My nephew enjoyed assembling the chat and passing it over to all of us to eat.
Here is how I made the chat.

You will need( for about 6 people)

Bhel or puffed rice about 250 g

For the sweet red chutney/ sweet sauce

1/2 tablespoon tamarind pulp/paste
1 fistful of deseeded dates
1 fistful of jaggary
Peppercorns 1/4 tsp (powdered)
Salt about a teaspoon/to taste
1/4 cup water

For the green chutney or green sauce

1 fistful coriander leaves/cilantro
1/2 fistful Pudina/mint leaves
A piece of green capsicum
A piece of ginger
6-10 peppercorns
2 cloves of garlic(if large)

For garnishing

1 medium sized onion finely chopped/minced
1 small green capsicum finely chopped/minced
1 small red capsicum (or a piece) finely chopped/minced
1 fistful coriander leaves and Pudina/mint leaves finely chopped/minced
Pinch of garam masala or chat masala made at home without chilly.
A cup of roasted peanuts or any nut of your choice
Khakra 


Method

Sweet red chutney
Grind all the ingredients for sweet red chutney and add to boiling water. Keep stirring and let the sauce thicken and turn translucent. Keep it aside and let it cool to room temperature.

Green Chutney

Blend all the ingredients mentioned under the green chutney to a paste without adding water and keep aside.


These go into the green chutney


 Bhel, vegetables, green chutney, red chutney, roasted  peanut ready to assemble


Assembling

In a plate sprinkle a tablespoon of  finely chopped vegetables, 1 crushed Khakra, 1 teaspoon peanuts, a teaspoon green chutney , a cup of puffed rice, 1 tsp or more of red chutney and top it with a pinch of chat/ garam masala. Serve immediately.

To eat
Carefully mix all the ingredients in the plate and enjoy a healthy snack!


Note: I didn't know there were two varieties of puffed rice. One is the thicker variety and the other a thinner variety which almost instantly absorbs the liquids and turns soggy. Out of the two packs I picked in a hurry from the supermarket, one turned out to be the second variety and I was surprised how one set of bhel turned soggy soon after assembling. Later my sister- in- law pointed the difference to me.

Though I have not added chillies, the chat tasted hot and spicy due to the raw onions.

You can alter the order and  proportions of the vegetables, chutney, nuts, Khakra, as per the persons liking.


Coconut shell clear soup

Coconut is an integral part of  south Indian cuisine. The meat/endosperm of the coconut is normally used and the shell is discarded to be used as fuel to ignite fire. In the past the shell was attached with a bamboo handle and used as a ladle. Even today a few traditional cooks add a shell to the soup or sambhar during feasts to improve the flavour and taste of the dish. My father used to suggest coconut shell infusion/soup to people with acidity and also people with peptic and duodenal ulcers. Many have used it mostly out of curiosity but were surprised by its effects on their health. This recipe uses the coconut shell as its main ingredient.


You will need
2 cups of water (or more)
Half  shell of coconut  broken into big pieces
1 tsp chopped cilantro
4-5 peppercorns
½ tsp cumin seeds
Salt, jaggery, lemon juice  to taste (optional)

Method
Clean and wash half a coconut shell and cut into large pieces with a hammer or pounding stone.
Boil water with the pieces of coconut shell till water turns brownish.
Add salt, jaggery, cilantro, roasted and powdered cumin and pepper.
Turn off the flame, add lemon juice if required.
Remove shell before serving this soup.


Note: You may boil coconut shell with water and consume the infusion or you may add it to rice when cooking. Its only disadvantage is that it gives a brownish colour.

Saturday, May 26, 2012


DIY Jasmine Garland

 Dark clouds, cool breeze, pleasant smell of earth, unfurled umbrellas, a warm drink , crunchy bites...... memories of the first showers. A week after the first showers, the local Jasmine shrubs  proudly display their scented magic in abundance.With all my concentration I try picking flower buds, viewing from all angles, searching above and under a hidden branch of Jasmine. After a lot of seeking, most pleased when I reach out to a hidden from sight bud. Finally return home with a satisfied smile of having harvested every ready to flower bud from each nook and corner of the shrub..


In the morning, much to my astonishment and amusement, the little shrub as if proudly announcing the winner- flowers of Jasmine smiling up at me! (Sigh.....I give up!:)) 


The flower I missed

Here is a tutorial on making a garland of Jasmine using natural fiber. The fiber used here is derived from the banana stem. since the fiber was a little thicker than needed, it was divided as you see in the picture below and hey that's my wonderful sister with the beautiful buds helping with the tutorial.


Banana stem string ready to use


Hold one end of the string firmly with the left thumb, index and middle fingers.Place two flower buds facing the opposite direction as shown.


Using the right hand form a loop around both the buds.


Now form another loop over the buds.


Pull gently the thread with right hand and tighten the loop. Be careful, as increased tension will cut the bud at the stalk.


Repeat with other buds till complete.


This is the other side of the garland, note the 'X's formed.


                                           Your garland is now ready to use. Enjoy! 


Note
: Buds are placed in a plate/tray with a little water to prevent blooming.
You may use this method of weaving flowers for flowers with a long stalk.


Moggina Jade


Friday, May 25, 2012


PumPeaCum Pocket Paratha


Last week was fun due to a visit from my sister and nephews. Sister’s visit helped me add on a new method of making stuffed Aloo Paratha. She called it ‘pocket paratha’. This week I made a new stuffing and used her technique to cover them.
To try out this healthy but yummy recipe you will need,
(  I seldom measure the ingredients that go into my recipe but will try my best to give you an approximate ideaJ)
For the stuffing (makes about 8 Paratha)
1 medium sized green capsicum
½ tsp cumin seeds or jeera
Half a cup fresh peas
3 inch piece of pumpkin
About 4 peppercorns
Salt and jaggery to taste
1 tablespoon oil/butter/ghee(optional)
For the dough
Whole wheat flour
Water (usually 1/3 quantity of wheat flour)
Pinch of salt(optional)

Method
Mix water, (salt), wheat flour and knead well. Add water if needed. When dough does not stick to your fingers/counter/vessel you know the dough is of the right consistency. Let rest for 15 minutes.
Mince capsicum, pumpkin and fresh peas.
Heat a heavy bottomed pan. Add ¼ tsp oil/ghee/butter. Now add cumin seeds.When the seeds change colour add the minced veggies and stir under low flame. Add salt, Jaggery and  powdered pepper and cook covered till water evaporates leaving a paste. Let cool and form tiny equal sized balls.
Divide the dough and shape them into equal sized balls.


 Roll the ball, dust with a little wheat flour if necessary.


Place the stuffing at the center and flatten the stuffing.


 Fold the sides over the stuffing .....


.                              .....and gently roll into required size.


 Cook both sides on a cast iron skillet/tawa till nice and brown.


Add a dot of butter/oil/ghee (optional) and serve.


Note: If you feel the stuffing is too soft and have trouble rolling the Paratha, heat stuffing with 1/2 tsp whole wheat flour and cool.
After a side is done, flip side and press down gently for the paratha to puff up forming a ‘pocket’.